Horizon 7 VSAN Policy Update

When you first deploy a Horizon desktop pool onto Horizon it will create a number of policies that it will apply to the desktops.

In Horizon 6 the policy applied to Floating Clones (Linked or Full) had a Failure to Tolerate of 0.  The rationale is that Floating Clones are volatile and it doesn’t matter if they are lost, which is fairly reasonable. The impact though was if a host failed, it would loose all VMs running on that host AND all VMs with their storage on that host which could cause a significant outage.   Since the size of the delta disks is relatively small and not a constraining factor I usually recommended increasing the FTT to 1.

Now in Horizon 7 this has become the default policy! If you upgrade a Horizon 6 environment to Horizon 7 it will not update the existing policy, but you can change the FTT to 1 even if running Horzion 6 and it will never override that. But if you are deploying a greenfield Horizon 7 environment it will deploy linked clones with an FTT of 1.  But of course you can change this to 0 if you want to reduce storage consumption at the risk of losing desktops in host failures.

Below is an overview of the default policies in Horizon 7.

Object FTT Method FTT Stripes Space Reservation Flash Read Cache Reservation
Floating Linked/Instant Clone RAID 1 1 1 0% 0%
Dedicated Linked Clone RAID 1 1 1 0% 0%
Floating Full Clone RAID 1 1 1 100% 0%
Dedicated Full Clone RAID 1 1 1 100% 0%
Replicas/ Instant Clone Parents RAID 1 1 1 0% 10%
Persistent Disk RAID 1 1 1 100% 0%

Using VSAN Sparse Swap Disks with Horizon

For those of us working with Horizon for a while we have long known that the VSWAP file has a significant impact on storage.  Just to clarify, when a VM is Powered On, vSphere will create a VSWAP file equal to the allocated memory minus the memory reservation.  For a 4GB VM this is 4GB, or with a 1GB reservation it would be 3GB.  This VSWAP file is also created for Instant Clone parents, unless reservations are used.  The space required for these files adds up quickly we are talking about  thousands of desktops.

Reservations are a perfectly valid way of reducing the size of these files, but the draw back comes in Horizon when you have a lot of Powered On VMs but perhaps lower user concurrency. For example if you have 100 dedicated VMs you may want them all Powered On for the users, but at any given time there may be only 50 people using them. If you reserve 100% of your memory to eliminate the VSWAP file then you cannot over-commit memory even if the machines are mostly idling, using very little active memory.

So enter the Sparse Swap Disk VSAN 6.2.  Up until now the VSWAP file on VSAN was provisioned with 100% space reservation, mimicking the behaviour of a thick-disk on SAN storage. This is to guarantee the VSWAP space is available if needed. But VSWAP files are only used as a last resort. vSphere will use Transparent Page Sharing (if enabled) and ballooning before using the VSWAP file.  Enabling Sparse Swap disks removes the space reservation form the VSWAP, so they are still there and can be used but have no space reserved for them, almost eliminating the space utilized by these files.

vswap disabled

How do I enable them?

Sparse Swap Disks are enabled on a Per-Host level through the command line and only available on vSphere 6.0U2 hosts.  The command is:

esxcfg-advcfg -s 1 /VSAN/SwapThickProvisionDisabled

vswap sparse nabled

When to use Sparse Swap Disks or Reservations?

If your hosts are not over-committed in memory which method should you use?  One issue with memory reservations is they affect HA Slot sizing and need to be managed on a per-VM basis.  In a typical VDI environment where all the VMs are identical and provisioned off the same parent image which has the memory reservation set then there is little benefit to using Sparse Swap Disks. You can fully reserve the memory for the VMs (because your not over-committed) and eliminate the VSWAP file that way. But if you’ve already provisioned a number of full clone desktops without a reservation and have found that you have not over-committed your memory, then perhaps you may use Sparse Swap Disks.

What about if you are over-committing memory? What I see typically in VDI environments is memory is just slightly over-committed, for example 10-20% because Transparent Page Sharing will save memory, it’s rare to have 100% concurrency of users and many users will not use their entire allocated memory. In this instance full reservations are not possible but the intent is to never need to use VSWAP files, as this causes a significant performance impact to the VMs and the users.  Here Sparse Swap disks are more beneficial as in these sort of environment people typically only reserve 50% of the VM memory, still leaving a significant amount of storage used for VSWAP files that will never write data.

What if the VSWAP is needed but there is no free space?

This would be bad….don’t do this. If there is not enough free space to write memory pages to disk then the VM will initially freeze and then crash.  If you are over-committing then ensure you allow some free space in your VSAN datastore to use VSWAP if required and monitor it as your roll out your environment.

Conclusion

I think the Sparse Swap Disk is an excellent new feature. The 100% Space Reservation for the VSWAP was set as a failsafe, to ensure the space was always available. By removing this restriction it allows architects to design their environment based on their requirements, just make sure you monitor it properly so you don’t get any nasty surprises.

Further reading:

Some of the top VSAN bloggers have written some good articles on Sparse Swap disks.

Yellow Bricks: VSAN 6.2 : Sparse Swap, what is it good for?
Cormac Hogan: VSAN 6.2 Part 5 – New Sparse VM Swap Object

There is a great HOL where you can check out the setting as well as other 6.2 features:

HOL-SDC-1608 What’s New with Virtual SAN 6.2
http://labs.hol.vmware.com/

Restricting access to the View Admin Console

I received an email from a colleague asking if it was possible to restrict access to the View Admin console (https://<viewserver>/admin) to specific IP addresses. It was not something I’d come across but was an interesting requirement. I knew that it runs on tomcat so a quick bit of searching and I found the answer.

Firstly we need the web.xml file for the admin console which is located at (by default):

C:\Program Files\VMware\VMware View\Server\broker\webapps\admin\WEB-INF\web.xml

Now we need to insert the filter for the IP Addresses. I inserted it at the end of the existing filters, which was just above the   <!– MessageBroker Servlet –> line.

<filter>
<filter-name>Remote Address Filter</filter-name>
<filter-class>org.apache.catalina.filters.RemoteAddrFilter</filter-class>
<init-param>
<param-name>allow</param-name>
<param-value>10\.0\.0\.21</param-value>
</init-param>
</filter>
<filter-mapping>
<filter-name>Remote Address Filter</filter-name>
<url-pattern>/*</url-pattern>
</filter-mapping>

The <param-value>10\.0\.0\.21</param-value> is where we define addresses and we include multiple addresses or wild cards, for example <param-value>10\.0\.0\.21|10\.0\.0\.22</param-value>

In the above example not even the localhost would be able to access the admin console. More details for people far more experienced than myself with tomcat can be found here:

http://tomcat.apache.org/tomcat-6.0-doc/config/valve.html#Remote_Address_Filter

Again this is unsupported, but that’s never stopped people in the past!


The Anatomy of an Instant Clone

If you’ve used Horizon View over the last few years, then you would’ve almost certainly come across linked-clones.  Linked-clones use a parent image, called a “replica” that serves read requests to multiple VMs and writes in each desktops are captured into their own delta disk.  They can also be used to change desktop update methodology, instead of updating every desktop you can update the parent image and recompose the rest of the desktops.

Horizon 7 has introduced a new method of provisioning with Instant Clones.  Instant Clones are similar to Linked-Clones in that all desktops read from a replica disk and write to their own disk, but Instant Clone takes it one step further by doing the same with the memory.  Instant Clones utilize a new feature of vSphere 6 where the desktop VMs are forked off a running VM instead of cloning a power off VM, which has savings for provisioning, updates and memory utilisation.

Golden Image

Just like with linked-clones, with Instant Clones you start with your Golden Image. This is the VM you install the operating system on, join to the domain and install any applications you want for all users. Follow the same OS optimisations you would for Instant Clones.  When you’re done, release it’s IP address, shut it down and create a snapshot.  Now you are ready to create your Instant Clone pool.  This VM should have VM Tools installed, and the Horizon Agent with the Instant Clone module. It is NOT possible to have the Instant Clone and Composer modules co-installed, so you will always need different snapshots if using Instant Clones and Linked Clones from the same golden image.  Reservations can be set on the Golden Image and they will be copied to the Instant Clones, reducing the VSWAP file.  An important thing to note is the Golden Image must be on storage accessible to the host you are creating your Instant Clone desktop pool on.
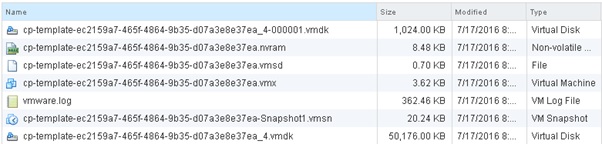
Template

When you create your pool, Horizon will create a Template.  A template is a linked-clone from your Golden Image created on the same datastore as the Golden Image.  It will have the name cp-template and will be in the folder ClonePrepInternalTemplateFolder.  The disk usage of these are quite small, about 60MB.  There will be an initial power on after the Template is created but it will then be shutoff.
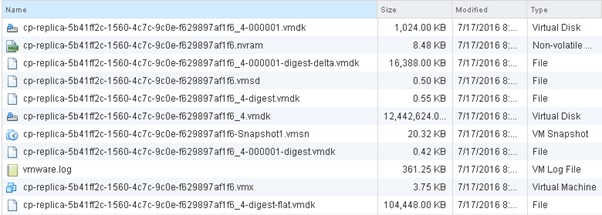
Template


Replica

Next Horizon will create a Replica. This is the same as the Linked-Clone replica.  It is a thin-provisioned, full clone of the template VM.  This will serve as the common read disk for all of your instant clones, so it can be tiered onto appropriate storage through the Horizon Administrator console the same way it was done with Linked Clones.  Of course if you are using VSAN there is only one datastore so tiering is done automatically. Horizon will also create a CBRC Digest file for the replica.  The replica will be call cp-replica-GUID and will be in the folder ClonePrepReplicaVmFolder. The disk usage of the replica will be depend on how big your Gold Master is, but remember it’s thin provisioned and is not powered on, so will have no VSWAP.

replica

Parent

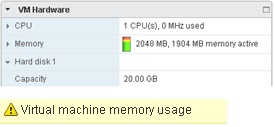
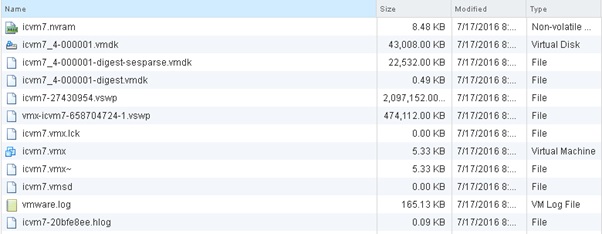
Now Horizon will create the final copy of the original VM, called a Parent.  The parent is what is going to be used to fork the running VMs.  The parent is created on every host in the cluster (remember we are forking running VMs here, so every host needs to have a running VM).  These will be placed on the same datastore as the desktop VMs, there will be one per host, per datastore.  Because these are powered on, they have a VSWAP file the size of the allocated vMEM.  In additional there will be a small delta disk to capture the writes booting the parent VM and the VMX Overhead VSWAP file, but this is and the sum of the other disks is relatively small at about 500MB.  These will be placed in the ClonePrepReplicaVMFolder.

parent

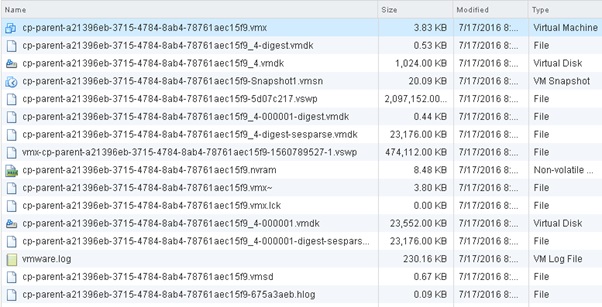
Something you’ll notice with the parent VM is that it will use 100% of it’s allocated memory which all also cause a vCenter alarm.

mem

Instant Clones

We are finally ready to fork! Horizon will create the Instant Clones based on the provisioning settings, which can be all up front or on-demand.  Instant Clones will have a VSWAP file equal to the size of the vMEM minus any reservations set on the Gold Master, plus a differencing disk.  The amount of growth for the differencing disk will depend in how much is written to the local VM during the user’s session but is deleted on logoff.  When running View Planner tests this grew to about 500MB, which was the same as when using View Planner for Linked Clones.  The provisioning of Instant Clones will be FAST and you’ll see MUCH MUCH lower resource utilisation of your vCenter Server and less IO on your disk subsystem as there is no boot storm from the VMs powering on.

ic

Conclusion

Instant Clones are a great new feature in Horizon 7 that take the concept of Linked-Clones on-step further.  They bring the advantageous of reducing boot storms, decreasing provisioning times and change windows as well as bringing savings to store utilisation.  Instant Clones introduce a number of new objects called Replicas, Parents and Templates so it is important to understand how these are structured and their relationships to plan your environment accordingly.

App Volumes 2.10 vMotion Support Requirements

I’ll spoil the ending for skim readers, App Vol 2.10 requires vSphere 6.0 Update 1a or vSphere 5.5 Update 4 (not yet released) for Writeable Volume vMotion support AND you must set a environment variable on your App Volume Managers (see below).

For those with a bit more time I’ll go into more detail.  If you have been using App Volumes prior to the 2.10 release you would’ve almost certainly come up against the Writeable Volume vMotion problem.  This is documented in VMware KB 2116782. A typical workaround (particuarly for floating pools) was to put DRS into manual mode and to monitor the hosts for resource utilisation.

App Volumes 2.10 added vMotion support but there was a very specific caveat that many people I have spoken to have missed.  Although it is clearly documented in the release notes , I’m sure we are all guilty at times of not fully reading all documentation before rolling out the update.

For vMotion support App Volumes 2.10 requires  vSphere 6.0 Update 1a or vSphere 5.5 Update 4, however at the time of writing vSphere 5.5 Update 4 has not yet been released.  The reason for this is App Volumes required an additional flag which needed to be implemented into vSphere which has been done in these versions.

The second requirement is a system environment variable must be added to all App Volumes managers within the App Volumes cluster to enable vMotion support. The variable is AVM_PROTECT_VOLUMES=”1″.  This variable should only be set if ALL of your vSphere hosts meet the above version requirements. If you have mixed versions of hosts then we can’t guarantee that things will not break if you set this variable to enable vMotion support. Secondly if you don’t set it on all of your App Volumes Managers I am not certain of the behaviour… feel free to test in a lab, but if you want to stay in a supported configuration then set the variable on all of your servers.

So it’s excellent that App Volumes 2.10 now supports vMotion for Writeable Volumes, but be aware of the requirements before installing the update and then scratching your head.

Memory reservations for Horizon View

I have often been asked about memory reservations in Horizon deployments.  People want to know how much should they reserve and what are the impacts, so I thought I’d write up something to clarify this.

Memory Reservations
Firstly lets talk about what memory reservations are, they are the amount of physical host memory that the VM is guaranteed at any time.  There is a common misconception that a VM will always consume it’s entire memory allocation, but this isn’t entirely true.  As per the vSphere Resource Management Guide (https://pubs.vmware.com/vsphere-51/topic/com.vmware.ICbase/PDF/vsphere-esxi-vcenter-server-51-resource-management-guide.pdf):

Until the virtual machines accesses its full reservation, VMkernel can allocate any unused portion of its reservation to other virtual machines. However, after the guest’s workload increases and it consumes its full reservation, it is allowed to keep this memory.

For server workloads that are rarely power cycled this is likely to have little impact, but with desktops this may have an overall impact as depending on their power policy there may be machines being powered off, or rebooted with some frequency which means their full reservation may not be allocated.  The next thing we need to look at is the effect of memory reservations on the VSWAP file.

VSWAP File
The VSWAP file, or actually VSWP is a file that vSphere create with each VM that allows it to swap memory pages stored in the hosts physical RAM into pages on physical disk.  The size of the VSWAP is quite easy to determine, the forumulae is:

VSWAP = Allocated vMEM – Memory Reservation

So a VM with 4GB of vMEM with a 2GB Memory reservation would have a 2GB VSWAP file.  There is also a VSWAP file for the virtual machine overhead, which whilst important to consider for capacity planning is not a part of this discussion.  By having a VSWAP file available to each VM for the unreserved portion of the memory, vSphere can overallocate memory and if it becomes memory constrained then pages can be swapped to disk.  This can have a major impact on performance so we need to understand when this will occur.

VSwapping
vSphere has a number of memory management techniques available to it that range in their performance impacts to the guests including transparent page sharing, memory compression, ballooning and vswapping.  Vswapping considered to be the most expensive form of memory management because the hypervisor does not have knowledge of which pages files an application needs to have quick access too, so it will not using the VSWAP file until it is under extreme memory pressure.

Decision Decisions
The decision on what to set a VSWAP file to has a few considerations.  Firstly comes memory sizing, if you are sizing your hosts to have enough memory for all of the VMs it is hosting then there is no reason (unless you want to buy more disk) not to use 100% memory reservations. So if you have 4GB per VM of vMEM, you’re planning to run 100 VMs on each host and your hosts have greater than 400GB of RAM, then use a 100% reservation.  If however you are assuming that the VMs may only use on average 70% of  their allocated 4GB you may choose to size your hosts with less physical memory. In this instance 100% memory reservation would not be suitable and you would want to start lower.  I find typically a 50% reservation is a good balance, if you don’t have 50% of the memory available for the planned amount of VMs then review your parent image sizing!

Conclusion
In a VDI environment the VSWAP used to be used when RAM was very expensive and storage was much cheaper, but in today’s market many architects are choosing to use All-Flash solutions where allocating 400GB of diskspace for 100 VMs to a VSWAP file that will never be used is just not cost-effective and servers are shipping with much more RAM than they used to allowing for less reliance on memory management such as TPS and VSwapping. Start with a minimum of 50% memory reservation to reduce your storage utilisation and the adjust from there based on the sizing of your physical memory in your hosts.

Where’s my View?

vSphere 6 just launched along with a number of supporting products.  More quietly View 6.1 was released however you my have trouble finding it on the download page.  Along with the release there has been a slight name change of View.  When VMware released View 6 the name was changed to “Horizon (with View)” and now with 6.1 it has changed to simply “Horizon”.  Of course the View name will live likely live on in documentation and product settings for sometime.  So if you want to try out the new version of View….errr… I mean Horizon release then go on to the VMware Download page and look for Horizon 6.

Screenshot 2015-03-13 10.43.33

VCP6-DT Exam Overview

Overview

Last week I sat and passed the VCP6-DT exam.  You may be wondering why a VCDX is sitting a VCP exam, for some reason I actually enjoy exams but I also like to see what is being examined to give feedback to the exam team and provide guidance for the community.  I sat the VCP5-DT exam about two years ago and found it to be the easiest of all the VCP exams, if you’d used the View Administrator console in anger you had a pretty strong chance of passing.  The VCP6-DT appears to have gone through a bit of an overhaul, questions were broader and relied less on memorizing the options on screens and more about knowledge of product functionality, which is a big improvement.  The other, and more important change, is the inclusion of Mirage and Workspace within the scope of the exam.  Since the exam has been updated to version 6, some of the key new features listed in the blueprint are:

  • Cloud Pod Architecture
  • Application Remoting
  • 3D Capability
  • VSAN

Preparation

The first step in preparing for any exam is figuring out what you don’t know.  I have a technique that I’ve used for many years, first I get a copy of the exam blueprint and then map it out to a spreadsheet.  I go through and rank myself 1 to 3, with 1 meaning I have no idea about the topic and 3 is I know it with absolute confidence so will not spend anytime studying it and 2 is I know a bit about it, but need to learn more.  I’ve attached the spreadsheet for the VCP6-DT, fill in the Assessment column and it’ll average out your score for each section and the total.  I aim to knock out as many 1’s as possible before trying to turn some 2’s into 3’s.

Prep time is always limited, and there is an old saying “anything over the passing mark means you studied too much”.  The pass mark is 60% so don’t try and get all 3’s.  Once you hit an average of about 2/3 look to book your exam, then if can getup to a 2.5 average on that spreadsheet by exam day, you won’t have a problem passing.

If you don’t have an existing VCP cert, then you will need to do a course. I’d highly recommend the Mirage and View Fast Track as this will cover two of the products covered in the exam.  If you already have a VCP, then the course is not required so see how you rank against the blueprint and decide if you need to do a course to pass.

Exam Day

Personally I think better on a full stomach so I always book my exams for 9am or 1pm, this one was at 1pm.  I find it’s more important for the longer exams but I still do it for the shorter exams.  You are provided with a lamented piece of paper for notes, when there used to be lots of maximums or command lines to remember I’d write them down as soon as I got in, but that’s not really necessary anymore. If there is anything you want to remember then this is the time to write it down.

The exam is 120 minutes and 135 questions.  So yes, that is less than 1 minute per question but the questions are short, and if you’ve prepped I’d say about 50% of questions you should be able to put an answer down within a few seconds.  If you are unsure it’s usually best to go through a process of elimination.  There is usually one answer that is completely wrong, and another that might be related but clearly not correct. This typically leaves 2 answers, giving you a 50/50 chance – if you’ve done your prep then that’ll skew your result  just enough (remember we are aiming for 60% here).  I remember my old maths teacher saying “75% of the time your first impression on a multiple choice is correct”.  My personal tactic is to attempt to answer the question, and mark it for review. At the end of the exam I go back through the the questions I’ve marked for review and now I need to convince myself that my answer was wrong before I change it – I find I rarely change them.

Summary

The intent of the VCP6-DT exam is to test the install and configure skills of an administrator across the Horizon Suite.  To pass you need to be proficient in:

  • View
  • vSphere
  • Mirage
  • Workspace
  • ThinApp

The blueprint primarily focuses on View, but to pass I’d suggest you’d need to be proficient in at least 2/4 of the additional products.  If your skills are weak in one of the other products such as Mirage or Workspace, then you’ll probably be fine as long as your View skills are strong and you have some skills in the other areas.


Exam Prep Spreadsheet – VCP6-DT Blueprint

Understanding View Disposable Disks

When VMware introduced Linked-Clones in View 4.5 there was a new type of disk included called the Disposable Disk. The purpose of this disk was to redirect certain volatile files away from the OS Disk to help reduce linked-clone growth.  I have read a lot of designs that utilize disposable disks but it has become clear that there is a lot of confusion and misunderstanding about what they do and exactly how they function.  This confusion is highlighted in a View whitepaper called View Storage Considerations (http://www.vmware.com/files/pdf/view_storage_considerations.pdf) which describes disposable disks as:

Utilizing the disposable disk allows you to redirect transient paging and  temporary file operations to a VMDK hosted on an alternate datastore. When the virtual machine is powered off, these disposable disks are deleted.

The three elements from this paragraph I want to demystify are:

  1. What is redirected to the disposable disk?
  2. Where are disposable disks hosted?
  3. When are disposable disks deleted/refreshed?

What is redirected? By default there are three elements that are redirected to the disposable disk.  The first is the Windows swap file, View Composer will redirect the Swap file from C: to the disposable disk. It is recommended to set this to a specific size to make capacity planning easier. swap The other elements that are redirected are the System Environment Variables TMP and TEMP.  By default, the User TEMP and TMP Environment Variables are NOT redirected.  However it is highly recommended to remove the User TEMP and TMP Environment variables, if this is done then Windows will use the System Variables instead and the user temporary files will then be redirected to the disposable disk. tempfiles usertemp Where is the disposable disk stored? There is a common misconception that like the User Data Disk, the Disposable Disk can be redirected to a different tier.  This is not the case and the Disposable Disk is always stored with the OS Disk.  In later versions of View you can choose the drive letter within the GUI for the Disposable Disk to avoid conflicts with mapped drives, but this setting and the size are the only customizations you can make to the disposable disk. When is the disposable disk refreshed? This is the question that tends to cause the most confusion.  Many people I have spoken to have said that it is refreshed when the user logs off, whilst others say it’s on reboot.  The Disposable Disk is actually only refreshed when View powers off the VM. User initiated shutdown & reboots as well as power actions within vCenter do not impact the disposable disk.  The following actions will cause the disposable disk to be refreshed:

  • Rebalance
  • Refresh
  • Recompose
  • VM powered off due to the Pool Power Policy set to “Always Powered Off”

This is quite important to understand, as if the Pool Power Policy is set to any of the other settings (Powered On, Do Nothing or Suspend) then your disposable disks are not getting refreshed automatically. What does all this mean? Understanding Disposable Disks and their functionality will enable you to design your environment appropriately.  The View Storage Reclamation Feature that was introduced in View 5.2 uses an SE Sparse disk for the OS Disk, this allows View to shrink OS disks if files are deleted from within the OS.  However only the OS disk is created as an SE Sparse disk, User Data Disks and Disposable Disks are created as a standard VMDK.  The key difference with this feature compared with Disposable Disks, is it relies on files being deleted from within the Guest Operating System, where as the Disposable Disk is deleted along with all the files it contains when View powers off the VM.  It is also important to note, that currently SE Sparse disks are not supported on VSAN. If you choose to use Disposable Disks in your design, then depending on your power cycle you may want to add an operational task for administrators to periodically change the Power On setting for the pool to “Power Off” within a maintenance window to refresh the Disposable Disk.  This is particularly important for the use case of Persistent Desktops which have long refresh/recompose cycles.

vCenter Permissions for View Composer & VSAN

With the last few releases of View there have been a number of new features that have been included that require additional privileges in vCenter for the service account used by View.  Many customers simply use the Administrator role so do not encounter permission problems with vCenter but for more secure customers the minimum permission set is required.  The below permissions are the minimum required for View to interact with vCenter whilst still being fully functional including configuring VSAN and the View Storage Accelerator.  This should be applied at the vCenter level to the service account used by View to connect to vCenter.

perm